Godot Modular Character Controller
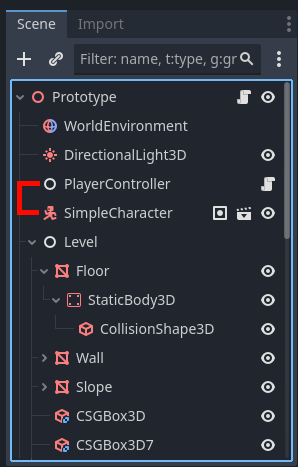
Example Level
This demo level is to show what can be done at a base level with this pack and to demonstrate the flexibility of decoupling input handling, action logic, and movement logic into their own nodes.
Controls
- WASD - move
- space - jump
- alt - dash (if obtained)
- tab - swap characters
- double tap space when controlling the third person character - toggle between flying and walking
In the level there are two characters. One is the Simple Character and the other the Example Character that are both included in the pack. The Simple (green) uses a first person camera and is the equivalent of using Godot's CharacterBody3D's Basic Movement template script. The Example Character (orange) uses a third person camera and starts off with a simple AI Controller script making it walk in circles. It uses a more complex movement script allowing it to step up and down ledges such as stairs, and it can switch between movement states to fly or walk.
In the level is also a purple cube that will add a "Dash" action to any character that walks into it.
About The Pack
This pack provides scripts that make it faster to develop well organize and reusable code for controllable characters. This is done by separating the code of a character out into actions that get attached to the character using Nodes, thus separating the logic into smaller more modular components that can be moved around and edited more easily.
The term "character" is used loosely but is used to follow Godot's naming, specifically the naming of Character Body 3D which is a "physics body specialized for characters moved by script". In the context of this pack a "character" is anything that may be controlled by a player or game AI. A character may be a person, car, bird, or magical floating sword.
Also, the term "AI" is used in the way it is game development, that being a script on an NPC that might just be a bunch of 'if' statements.
Features
- Action Nodes - separates out logic for characters into organized nodes
- Action Container - manages Action Nodes allowing them to be used dynamically as well as safely called by Controllers
- Action Container Configurations - defined sets of actions that can be quickly swapped between at runtime on a character
- Controller - the bridge between user and character separating input from character logic
- Movement States - nodes responsible for processing the characters physics during different forms of movement (EX: grounded, flying, swimming)
- Movement State Manager - a node for changing the active Movement State of a character
Example
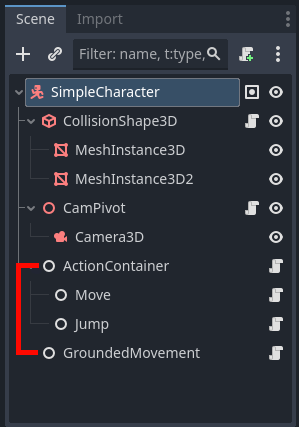
GroundedMovement is a node with a script that tells the character it is on how it should process movement. This is where gravity is applied, root motion, and other forces. (two versions of this script are included in the pack)
The Nodes "Move" and "Jump" are simple scripts that apply forces to the character making it move as if it is walking, or jumping. They are Action Nodes. Adding these to "ActionContainer" (a script in this pack) allow a Controller to tell the character to do such an action.
A Controller is a node that is given a character to control. The Controller ties input to actions that are called on the character through the Action Container.
To create your own characters you only need to make a Controller, to tie input to actual actions, and the Action Nodes, to actually have the character perform the actions.
By using this pack, to create controllable characters, monolithic character scripts are avoided and modularity is achieved which allows for more dynamic characters as Action Nodes may added or removed easily at runtime to change the abilities of characters.
View on Github for more details.
Development log
- Future Plans and Updated README96 days ago
Leave a comment
Log in with itch.io to leave a comment.